Sewing

bicycle bucket tutorial

Just want to say thank you to Vanessa from V & Co. and all her wonderful readers!  Thanks for letting me be your guest today.

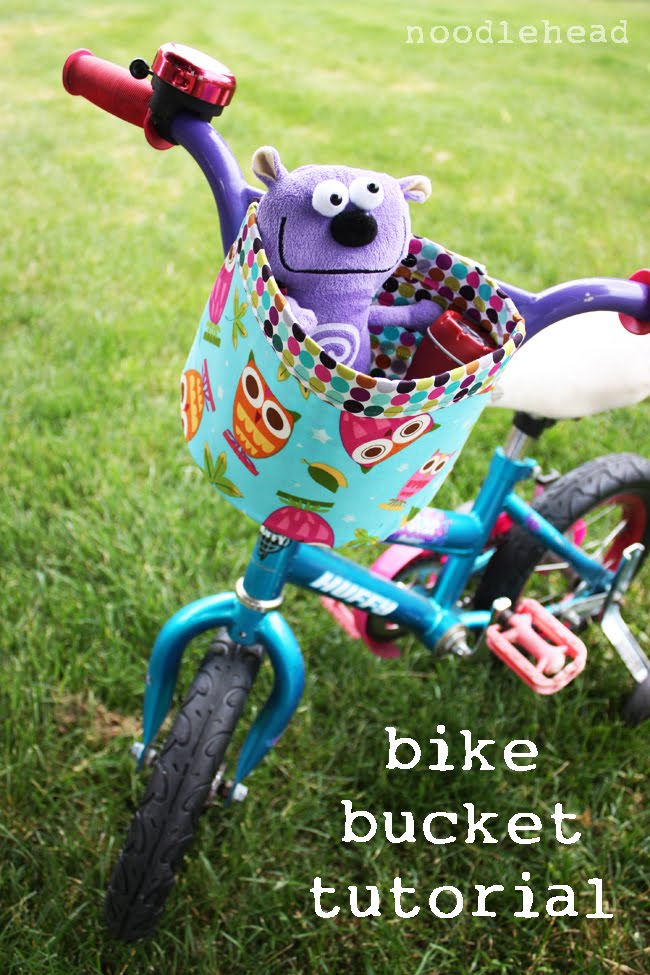
Ready for a fun summertime project?

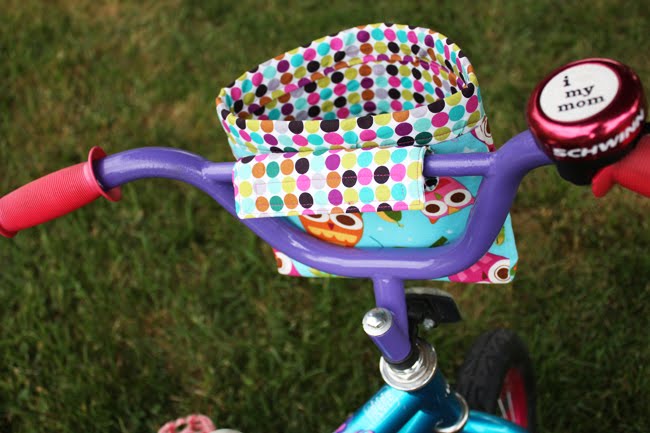
My husband and I were doing some tune ups on my daughter’s bike earlier this spring – you know, new tires, paint the handlebars, fix the seat, fun stuff. So, when we were out tire shopping I saw the cute bike baskets at the store. I was like “oh, we have to get her a basket, it would be so fun” and he’s like “you should just make one”. So here we go!

Bicycle Bucket Tutorial - Noodlehead

Materials:

Bicycle Bucket Tutorial - Noodlehead
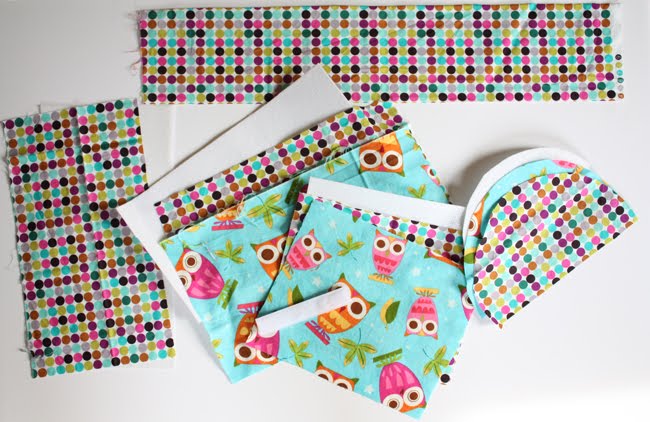
  • 2 fat quarters (18″x22″) of coordinating prints
  • 21.5″ wide by 4.5″ tall piece for binding top of bucket
  • stiff double side fusible interfacing (I used Peltex 72F which I found at Walmart)
  • 5 inch piece of 3/4″ wide velcro
  • scrap of medium weight fusible interfacing
  • thread, pins, etc.
  • Pattern piece (updated May 2013)

Cut your materials:
From exterior fabric cut

  • one piece 8.5″ wide by 7″ tall
  • one piece 12″ wide by 7″ tall
  • one piece from the pattern (it’s the bottom of the bucket – use the solid line).  Cut the same size pieces from the lining fabric.

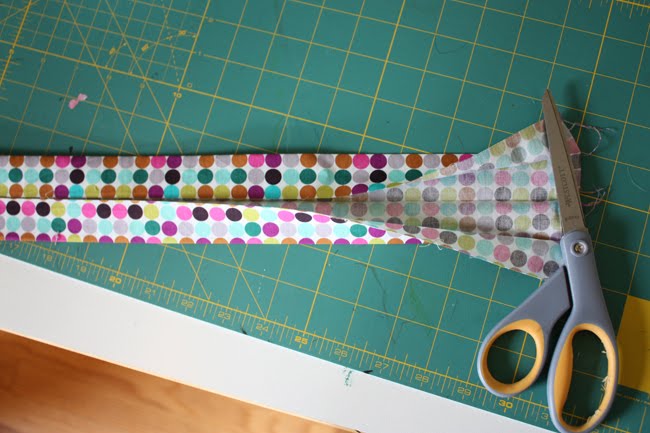
For the tab that attaches the bucket to the bike handle bars cut a 6″ wide by 11.5″ tall piece from the lining material and cut one piece 21.5″ wide by 4.5″ tall for the top binding of the bucket.

From the double sided fusible interfacing cut one piece 7.5″ wide by 6″ tall, one piece 11″ wide by 6″ tall and one piece from the pattern following the dotted line.

{All seam allowances 1/2″ unless otherwise noted}

Sew the exterior and lining:

Bicycle Bucket Tutorial - Noodlehead

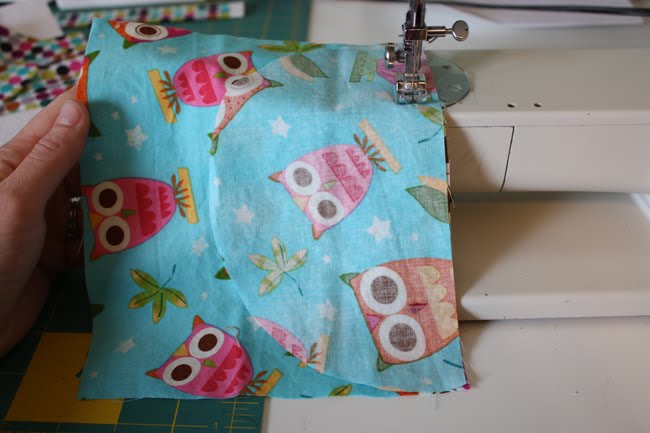
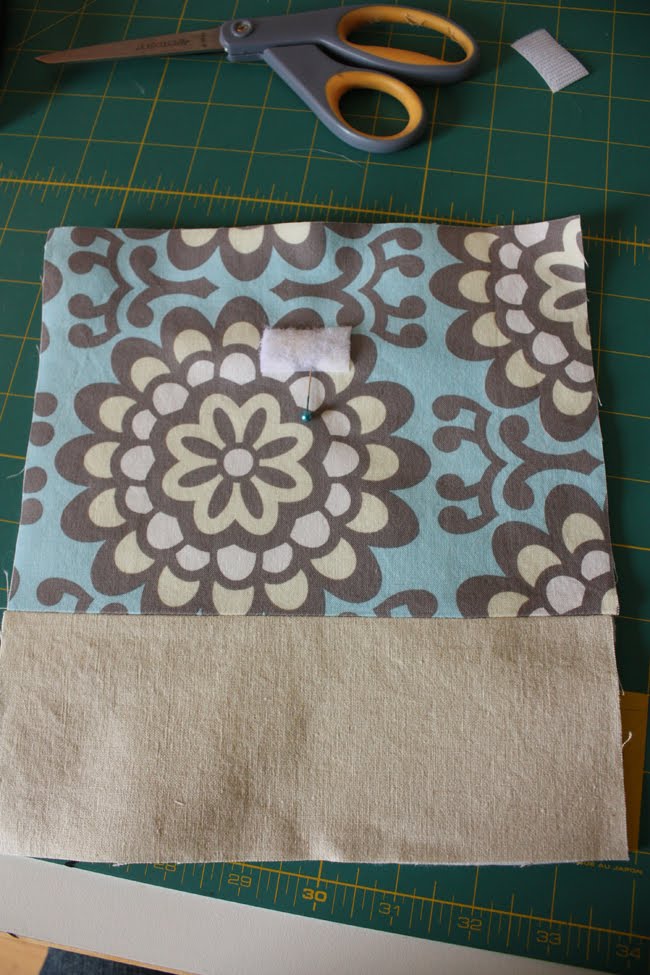
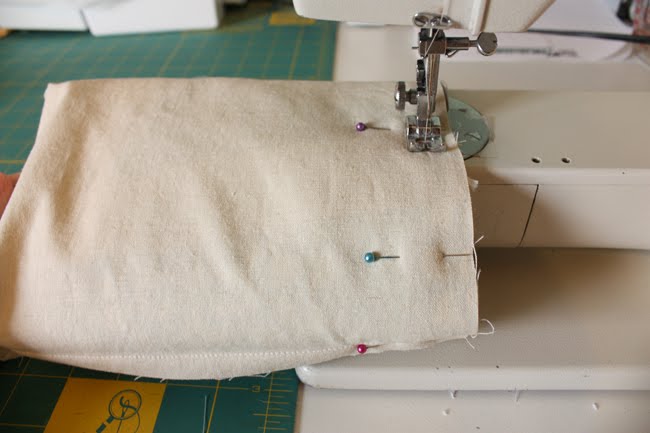
Place the short rectangle (8.5″ wide by 7″ tall piece) RIGHT sides facing to the bottom bucket piece.  Sew.

Bicycle Bucket Tutorial - Noodlehead

Open up the piece you just sewed and take the long remaining rectangle, find the center (should be at 6″) and pin it to the center of the curved bottom bucket piece.

Bicycle Bucket Tutorial - Noodlehead

Starting from the pin sew following the curve of the bottom bucket piece, adjusting as you go.

Bicycle Bucket Tutorial - Noodlehead

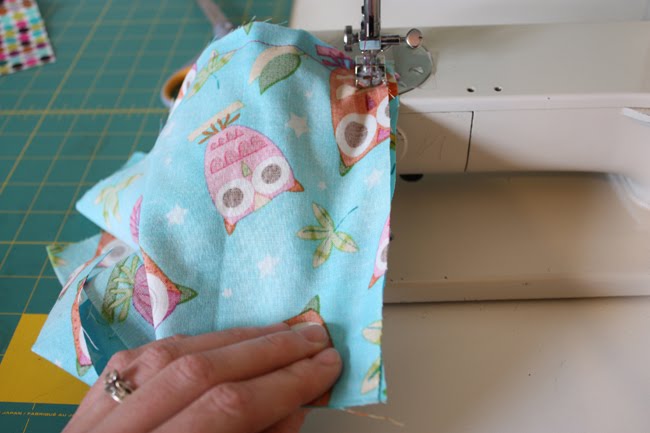
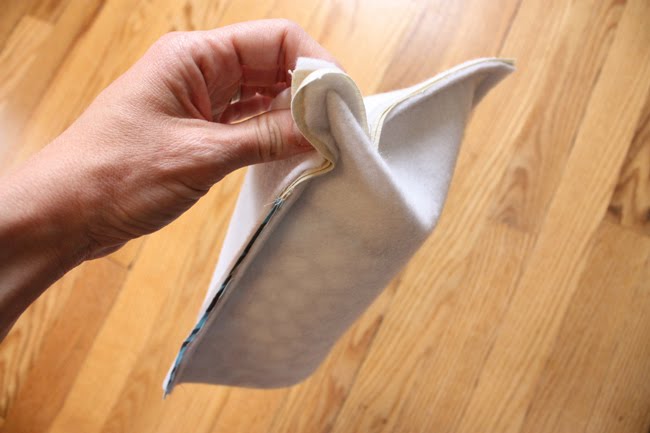
When you reach the seam that joins the bottom bucket piece and the short rectangle, stop with the needle down and lift presser foot, rotate the pieces so that the two rectangles are facing RIGHT sides together.  Put presser foot back down and continue sewing.  Go back to where you started in the middle of the curve and sew the remaining side.  {When lifting the presser foot and rotating the pieces so that they align, it might feel and look kind of wrong or weird, but I promise they’ll line up and look great when you turn it right side out.}

Bicycle Bucket Tutorial - Noodlehead

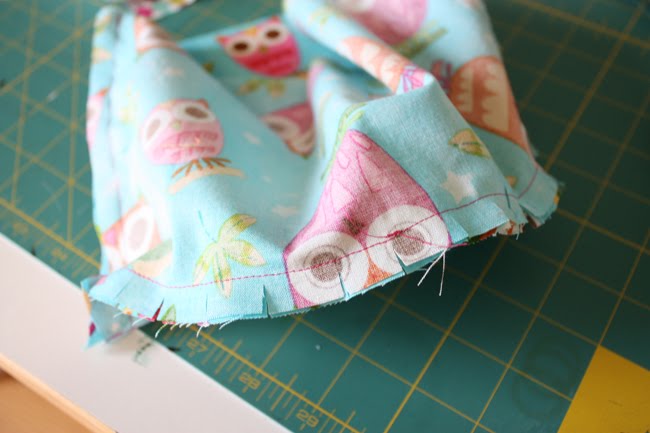
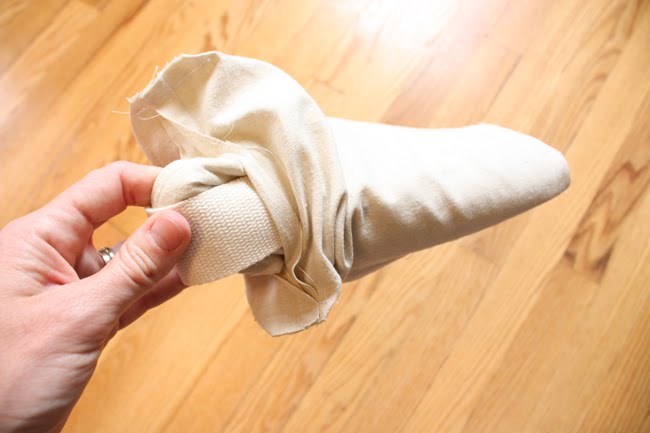
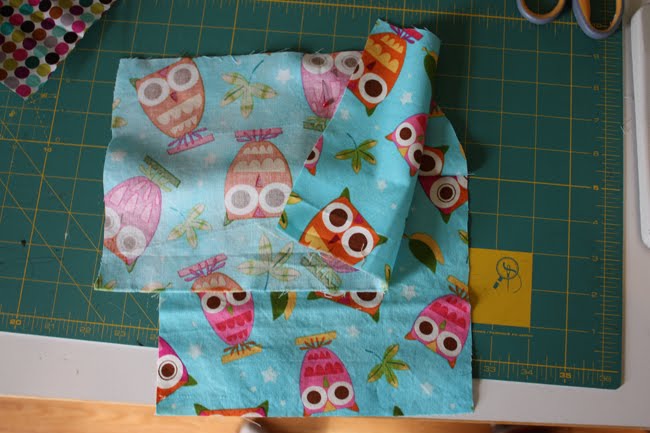
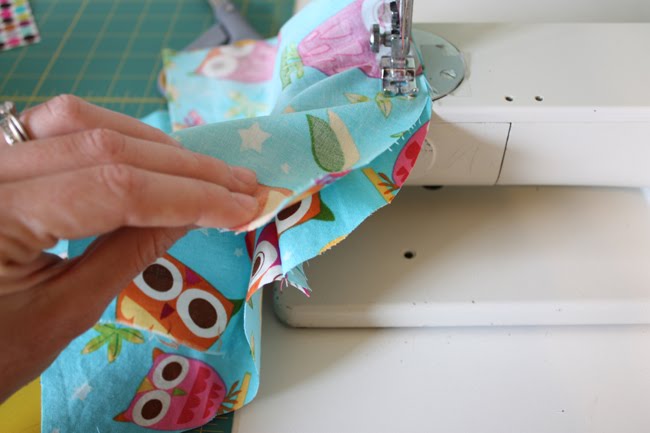
Clip curve.  Turn RIGHT side out.  Repeat same process for lining pieces.

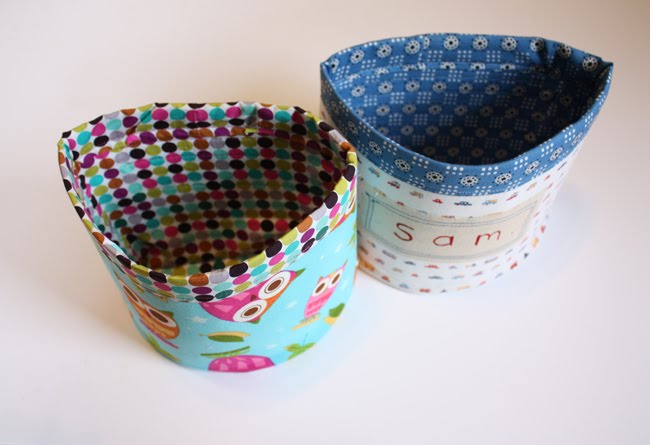
Assemble the bucket:

Bicycle Bucket Tutorial - Noodlehead

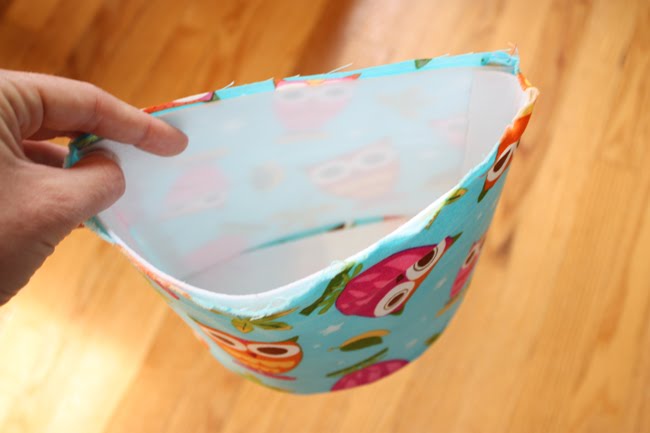
Take the double sided fusible interfacing pieces and place them into the exterior of the bucket.

Bicycle Bucket Tutorial - Noodlehead

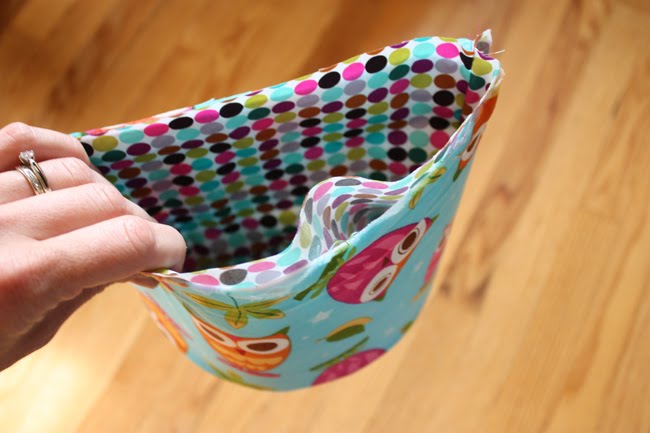
Then place the lining into the bucket.

Bicycle Bucket Tutorial - Noodlehead

Press on all sides (exterior and lining and bottom) of the bucket to fuse in place.  Set aside.

Make the handle bar attachment:

Bicycle Bucket Tutorial - Noodlehead

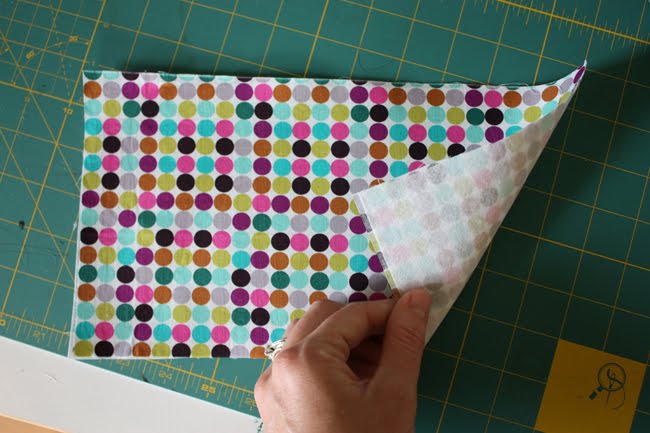
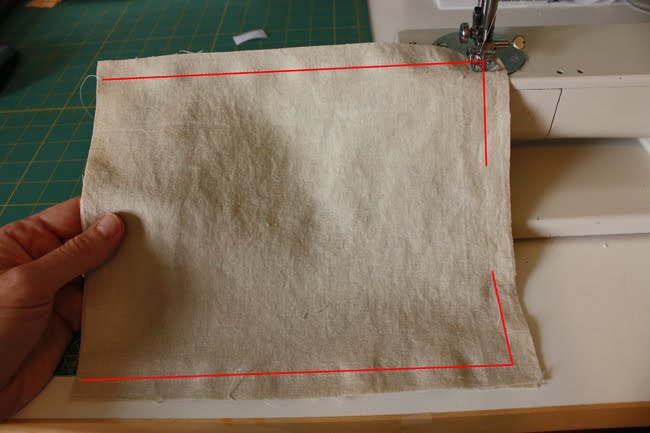
Take the 11.5″ tall by 6″ wide piece and fuse on a piece of medium weight interfacing.

Bicycle Bucket Tutorial - Noodlehead

Fold in half lengthwise RIGHT sides together.  Sew along all open sides leaving a 2″ opening in the bottom for turning.  Clip corners, turn right side out.

Bicycle Bucket Tutorial - Noodlehead

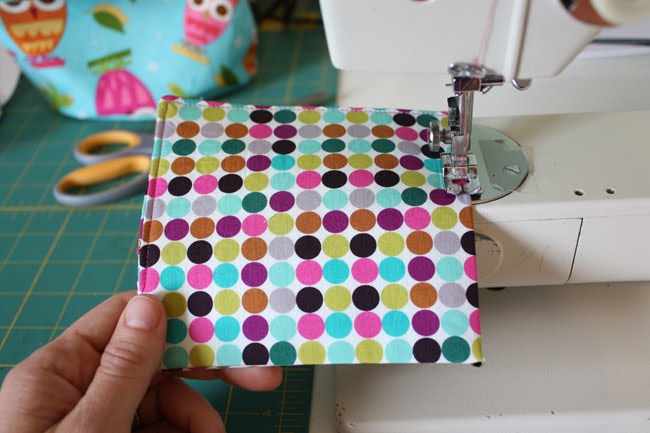
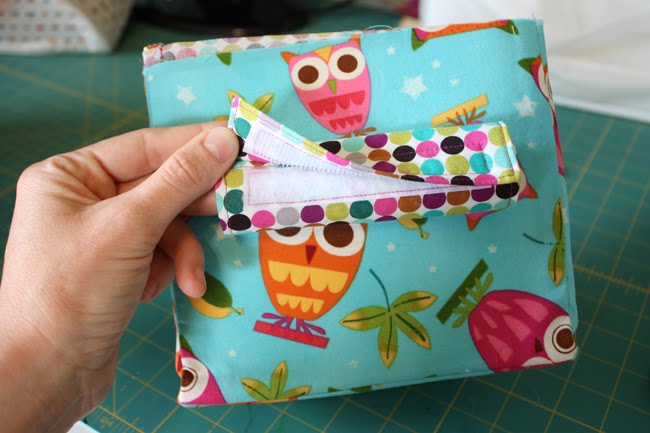
Topstitch around entire piece.

Bicycle Bucket Tutorial - Noodlehead

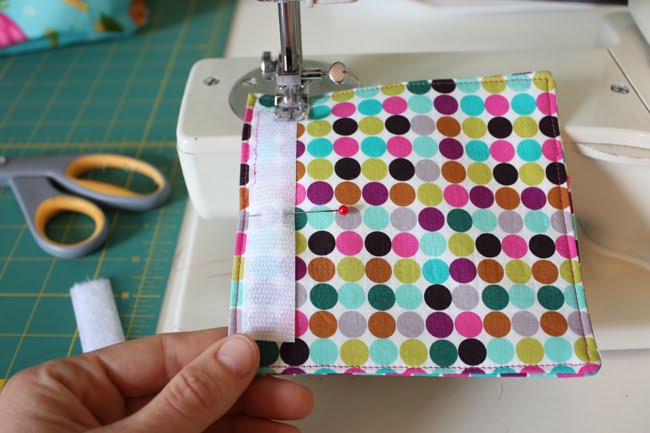
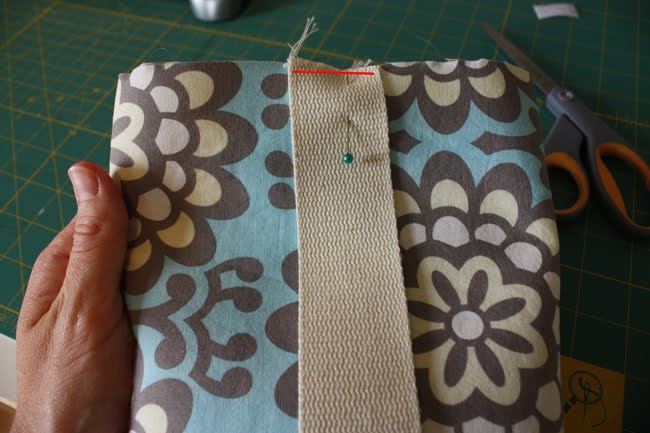
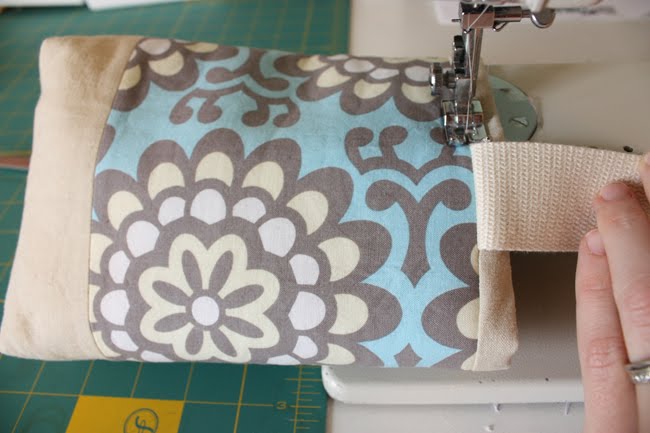
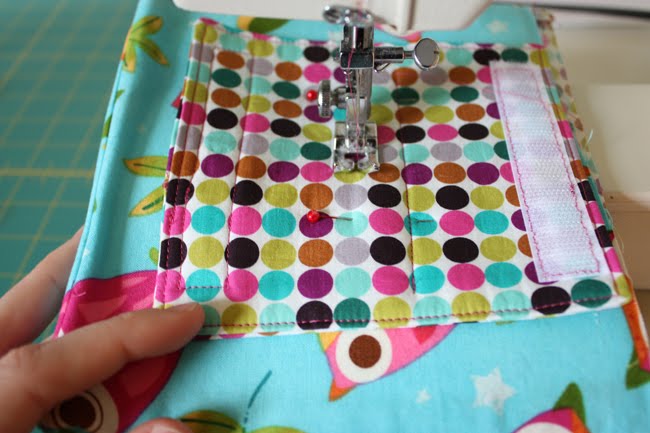
Now take one side of the velcro, sew into place along one of the short edges.

Bicycle Bucket Tutorial - Noodlehead

Take the remaining piece of velcro and sew into place on the other end and opposite side you just sewed the first piece of velcro on (as pictured above).

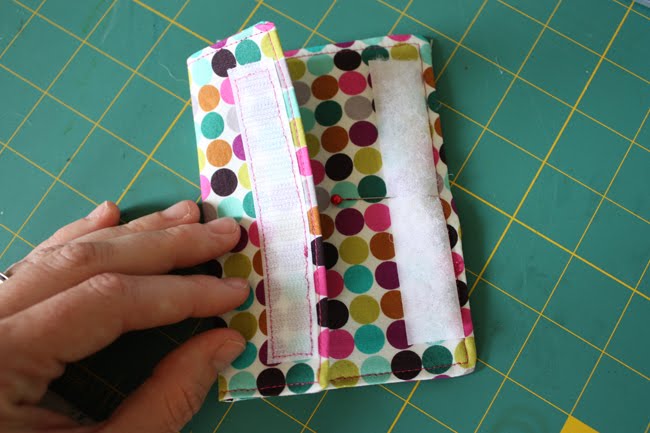
**Now here is where you could do it differently, I sewed this handle bar attachment onto the bucket on this next step, but you could also hold off and sew it on as the very last step, your choice.

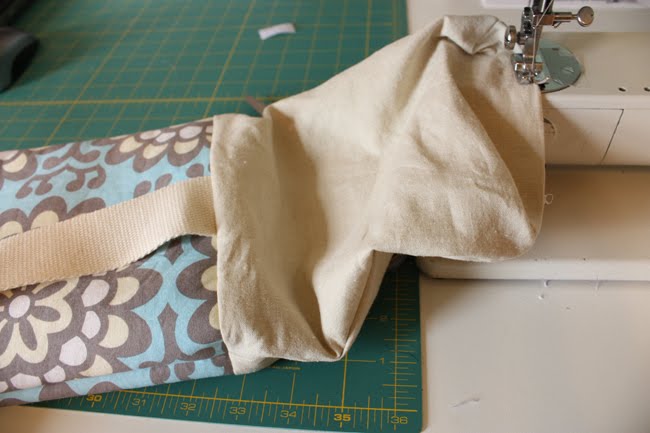
Sew attachment to bucket:

Bicycle Bucket Tutorial - Noodlehead

Pin the handle bar attachment to the bucket about 2-3″ from the top.  Sew two straight lines completely across the attachment piece about 3/4″ apart.

Bicycle Bucket Tutorial - Noodlehead

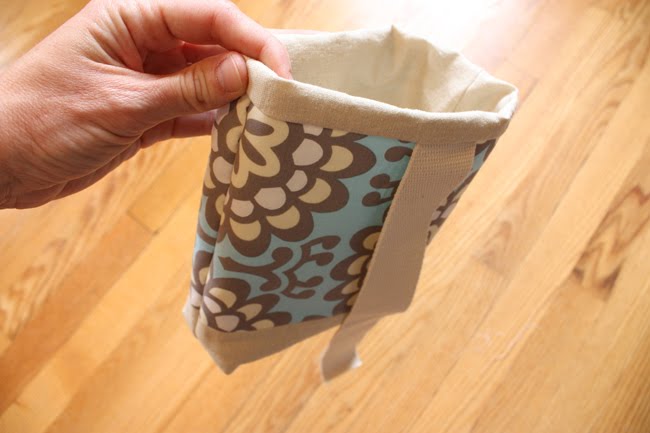
Finishing with the binding:

Bicycle Bucket Tutorial - Noodlehead

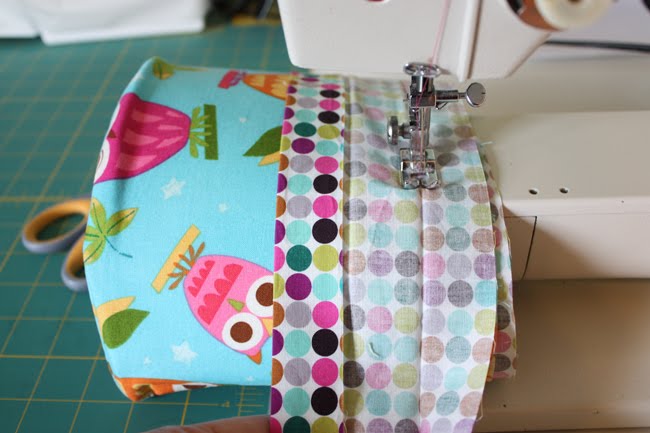
Now take the binding strip and press it in half lengthwise, open, and press raw edges to the center.  If you’ve ever done quilt binding, we’re going to finish this the same way.

Bicycle Bucket Tutorial - Noodlehead

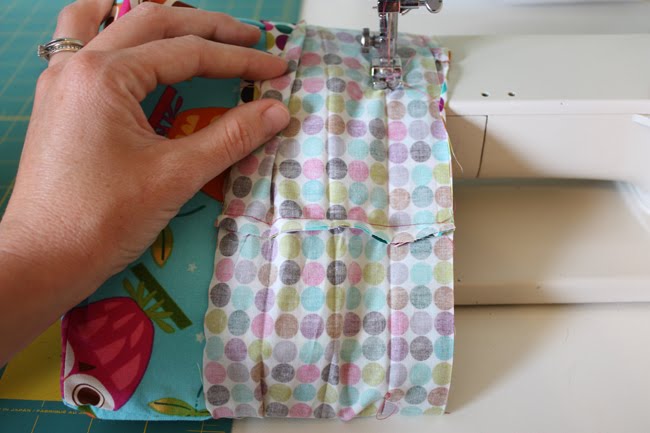
Unfold the binding strip, pin in place aligning raw edges at the back (center) of the bucket.  Start sewing along the crease towards the edge of the bucket (where red arrow is pointing) and continue around to the other edge.

Bicycle Bucket Tutorial - Noodlehead

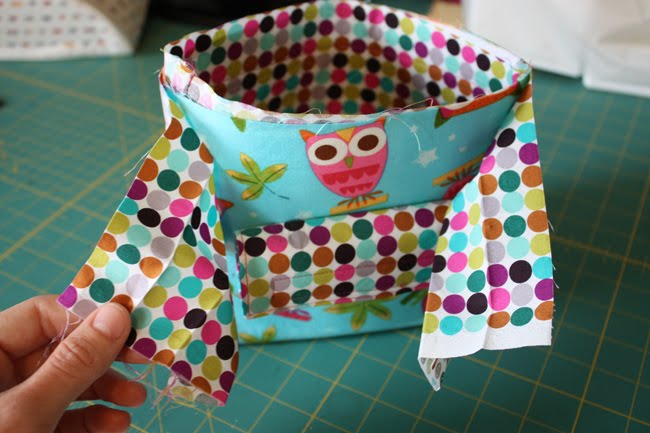
It should look like this now:

Bicycle Bucket Tutorial - Noodlehead

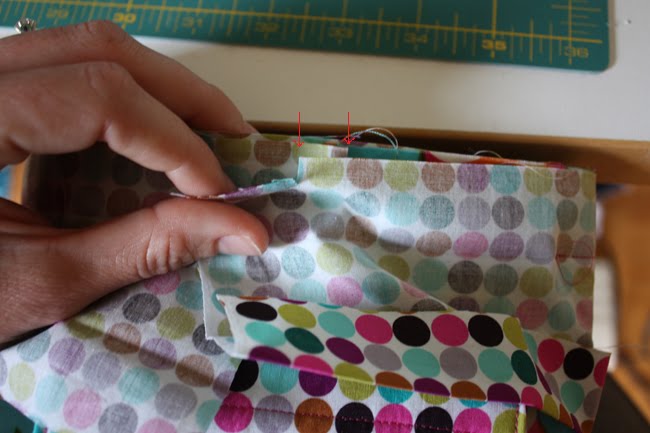
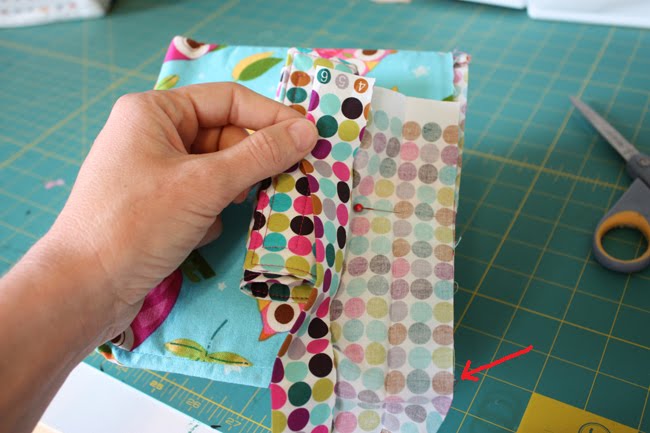
Trim the binding piece so that they overlap by 1/2″ (see tiny red arrows above).

Bicycle Bucket Tutorial - Noodlehead

Now grab the bucket and give it a squish and place the binding ‘tails’ RIGHT sides together.  Sew using a 1/4″ seam allowance.

Bicycle Bucket Tutorial - Noodlehead

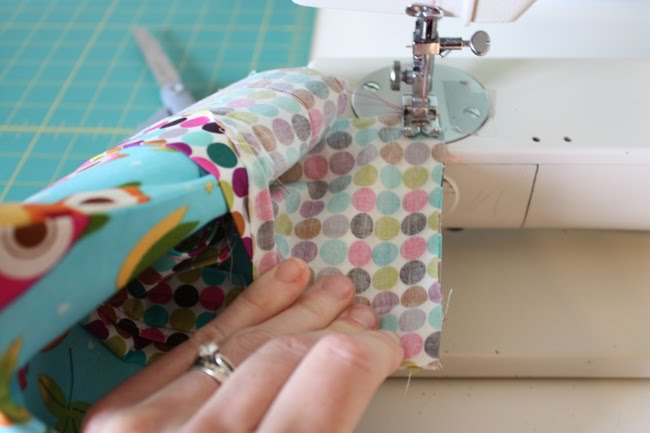
Now un-squish the bucket and sew the remaining part of the binding closed, again along the crease.

Bicycle Bucket Tutorial - Noodlehead

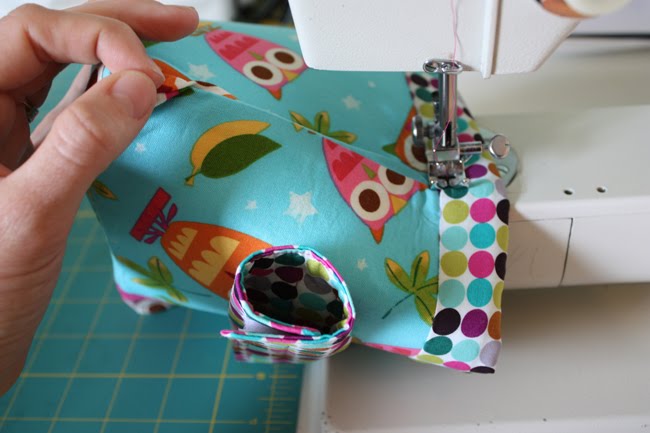
Flip the binding over the top and in towards the lining.  Topstitch along exterior close to the seam.  Press!!!

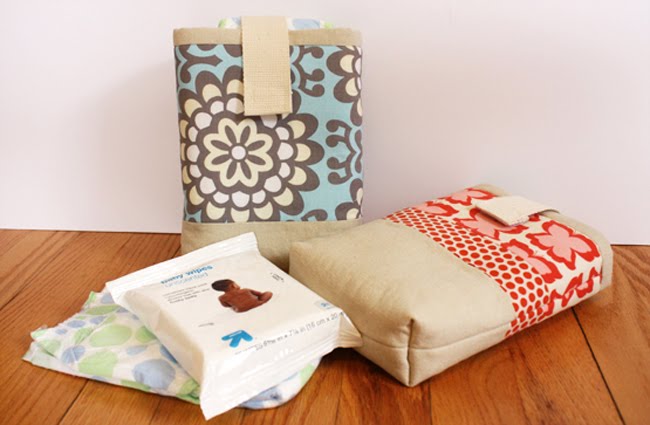
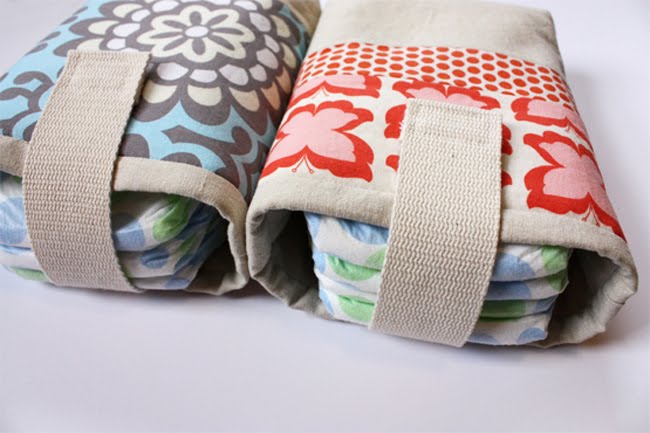
That’s it, one complete bicycle bucket ready for a trip to the park. Have fun!

Bicycle Bucket Tutorial - Noodlehead

Don’t forget about the boys!!

Bicycle Bucket Tutorial - Noodlehead

Just wanted to add that if you’re looking into different bike basket options, Christie from A Lemon Squeezy Home has a couple cute tutorials as well:  Vintage Inspired or her Boy’s Basket.

Sewing

better late than never: quilt market

Vanessa talked about it, Dana talked about it, so I’d better get to talking about it! 

Yep, you guessed it, the International Quilt Market in Minneapolis, Minnesota.  The stars and planets must have aligned for me.  I was so lucky that Minneapolis is just a couple hour drive from my house, otherwise I probably wouldn’t have made it.  Of course once I heard who else was going to be there, I knew I had to find a way to go!

If I wasn’t me, I’d be so jealous of anyone who got to even go to quilt market, much less meet up with some of the coolest bloggers around.

It was a whirlwind of a day.

Ooogling booths and booths of fabric (without being able to buy it, such a tease – almost wish I owned a fabric shop). 

I circled the Kokka/Echino booth roughly 18 times.  The projects they had made up were right up my alley!

Rubbing elbows with the biggest designers.  Well, I didn’t rub elbows with anyone, but just stood in amazement when Vanessa and I went to talk to none other than Amy Butler herself!  For all your knitters out there – Amy’s coming out with a whole collection of yarn and knitting patterns!  She’s also got a new book on the way: Amy Butler’s Style Stitches.

Anna Maria Horner was always busy interviewing for her new book whenever I strolled by.

Sandi Henderson was such a sweet person!  Luckily I had just gotten her book, Sewing Bits and Pieces, and had made a few projects with one of her fabric collections Meadowsweet. (Yep, Meadowsweet 2 is on the way soon).  She was so pretty and gave me some great advice, too!

I met up with Dana and we got to sit and chat about life.  I was so nervous about meeting her, I mean, Dana from MADE?! wow. 

We met up with Vanessa for a little fabric shopping, we had a blast.  The store had the most fabrics I had ever seen.  It was so fun just being able to talk and laugh with those two ladies, they’re both amazingly talented and just fun to be around.  And yes, I had to take them to the Mall of America, it’s just one of those places you have to go.  By the time dinner was done I was totally wiped out and we parted ways, hopefully we’ll all be able to get together again sometime! 
Sewing

diaper pouch tutorial

I’m happy to be a part of luvinthemommyhood’s baby bonanza today, with a nice little break from all things kitchen!

yes, this would be my version of a diaper keeper.  I made this one with myself in mind.  I just needed to be able to actually see how many diapers I had in the pouch, otherwise I’d get down to one diaper and be on an all-day outing.  Not good.

Materials:

1/3 yard linen (you’ll have plenty of scraps leftover)
fabric scraps
cotton webbing 1.5″ wide – 8″ long
velcro (3/4″ wide by 1.25″)
fusible fleece – you could also use cotton batting
sewing machine, thread, pins, etc.

I was surprised at how quick this project is, so definitely churn some out for friends and family!

Cut the pieces:

{pictured above are the materials for the butterfly print version – but you get the idea}
From the linen cut 2 pieces 8.5″ wide by 5″ tall.  Also cut 2 pieces 8.5″ wide by 10″ tall – this will be your lining.  From your scraps (and feel free to make these strips patchwork, too) end up with 2 pieces 8.5″ wide by 3.5″ tall and 2 pieces 8.5″ wide by 2″ tall for the version shown with the butterfly print.

{For the blue version cut 2 pieces 8.5″wide by 3.5″ tall of linen and 2 pieces 8.5″ wide by 6.5″ tall of the blue print – sew these two together and they make up the exterior of the pouch.}

Cut 2 pieces of fusible fleece 8.5″wide by 9.5″ tall.

Make the exterior:

Sew the strips and linen pieces together using a 1/4 inch seam allowance (making two finished pieces 8.5″ wide by 9.5″ tall).  Press seams open.  Fuse fleece to WRONG side of both exterior pieces.

Sew on the fuzzy piece of the velcro about two inches down and centered on one of the exterior pieces (this will be the front of the diaper keeper).

With RIGHT sides facing, sew the two exterior pieces together using a 1/2″ seam allowance around both sides and bottom.

Pinch the corners together and sew a straight stitch 1″ from the point.  Do this for both corners.  Clip corners.

Make the lining:

With RIGHT sides facing, sew the lining together on the sides and bottom, but this time leave a 3″ opening at the bottom (this will be for turning later).  Box the corners as you did with the exterior.

Attach the cotton webbing:

Baste the cotton webbing to the RIGHT side of the exterior piece at the back of the diaper keeper. Another option on this step would be to make a fabric strap.  If you do use the cotton webbing I would recommend getting a fairly thin one (mine was from Hancock Fabrics), some webbing is much thicker than others.

Assembling the diaper keeper:

With the RIGHT sides facing, slip the exterior into the lining, matching up the top and side seams, pin and sew all the way around the top with a 1/2″ seam allowance.

Be sure to tuck the cotton webbing down into the diaper keeper.

Pull the exterior through the opening you left in the lining.  Poke out corners.

Sew the opening shut with a very small seam allowance, or sew by hand.

Push the lining into the diaper keeper.  Since the lining was a 1/2″ taller than the exterior, it’ll form a nice border along the top edge of the diaper keeper.

Press and stitch “in the ditch” all around the diaper keeper.

Finish the strap:
Pull the cotton webbing around to the front and adjust as necessary to line up with the fuzzy part of the velcro.

Turn under the webbing twice and pin on the vecro.  Take your time and sew on the hook part of the velcro at the end of the strap.

Fill with 3-4 diapers, travel wipes, and maybe even a tube of diaper cream and you’re all set!

{I think this would also hold 2 cloth diapers depending on how bulky they are.  I use a few cloth diapers while we’re at home and they fit in the diaper keeper  reasonably well.}