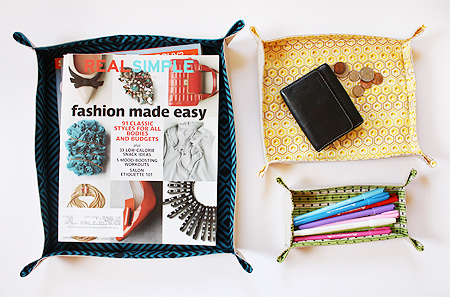
This project is really fun because you can make it as simple or complex as you’d like and there’s really no rules, love that. So for making a really fun customizable fabric tray read on…
I had made a tray earlier this year for my dad and I figured this would be a simple project to share!
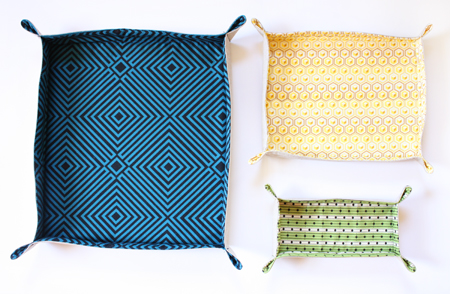
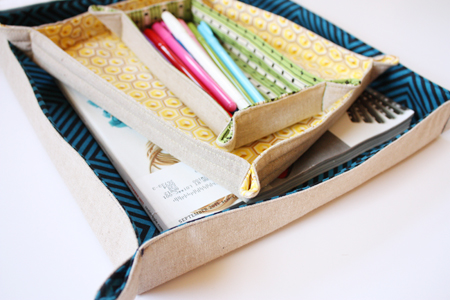
This is a great project to make to combine with a few other goodies for a hostess gift, a gift for your not-so-organized husband as a place for him to set his glasses and wallet and spare change, or for a special friend. Fill it with treats, magazines, recipes, anything works! I’ve included dimensions to make three different sized fabric trays: pencil size (small), spare change size (medium), and magazine size (large). This is also a great scrap busting project, so dig into your scrap bin and pull out your favs. Enjoy!
Materials:
For small fabric pencil tray:
- 2 pieces of fabric 10″Wx6″T (this is where you can get as fancy or simple as you’d like, think of patchwork, quilt blocks, anything goes – just trim it down to this size)
- one piece cotton batting or fusible fleece 10″Wx6″T
- one piece peltex 7″Wx3″T stiff double side fusible interfacing (I used Peltex 72F, found at Walmart/joanns, etc.)
For medium fabric spare change tray:
- 2 pieces of fabric 12″Wx10″T
- one piece cotton batting or fusible fleece 12″Wx10″T
- one piece peltex 9″Wx7″T stiff double side fusible interfacing (I used Peltex 72F, found at Walmart/joanns, etc.)
For large fabric magazine tray:
- 2 pieces of fabric 16×15
- one piece cotton batting or fusible fleece 16×15
- one piece peltex 12×11 stiff double side fusible interfacing (I used Peltex 72F, found at Walmart/joanns, etc.)
Directions:
Fuse fleece to one of the main fabric piece (if using fusible fleece), fuse peltex centered onto the fabric you’ve selected for the bottom of your tray.
Layer batting (no need if you’ve already used fusible fleece), fabric for inside of tray RIGHT side up, fabric for bottom of tray RIGHT side down (see picture, the peltex is fused center, leaving the plastic layer on for now).
Pin. Sew along all four edges using a 1/4″ seam allowance, but leaving a 3-4″ opening for turning (5″ opening for the large tray). Clip corners. Remove plastic film from peltex. Turn right side out, push out corners with a chopstick or other dull instrument. Press, tucking the raw edges of the opening inside. Also press the peltex rectangle to fuse it to the tray interior.
Topstitch along all edges, thus closing the opening you left for turning.
Sew a rectangle along the edges of the peltex rectangle. You’ll be able to feel the edge of it through the fabric, if not, sewing through it isn’t a big deal. A water soluble pen might come in handy to keep your rectangle looking like a rectangle! You can even do more quilting at this point if you wish.
Pinch each corner at the edge of the peltex, bending the fabric up to meet at the edges.
Here you can either use floss (or even thread) and sew a few stitches through the two edges to hold them together.
Or you can pin them together and stitch straight up the corner you pinched (remembering to backstitch). Repeat for the remaining 3 corners and you’re set!
Fill with whatever your heart desires and give that gift!!
I’d also like to note that there are a lot of similar projects out there, so if this isn’t your cup of tea, try one of these fab tutorials:
- fabric tray by chic chic sewing
- trinket tray by heather bailey
- fabric scrap basket by The Sometimes Crafter
- happy hostess gift box by Jennifer Casa for Sew Mama Sew
Or better yet, stop by my blog and check out all my tutorials and patterns, maybe you’ll find something else you just HAVE to make! Thanks for having me Cindy!
[fabrics: linen, lizzy house 1001 peeps (blue), tula pink parisville (yellow), greenfield hill denyse schmidt (green)]


That’s a great tutorial! I’ve been meaning to make such trays, but I didn’t quite know how to!!! Thanks for sharing. I’m posting it in my great tutorials page!!
As always, I love your simple-to-follow and user friendly tutorial! And thanks for introducing my fabric tray tutorial here 🙂 I’ve been following your blog for a while and loving it♪
***amy/chick chick sewing***
Just a quick note to let you know that a link to this post will be placed on CraftCrave today [06 Oct 09:00pm GMT]. Thanks, Maria
I adore an individual’s basic-to be able to-follow plus in order to tutorial! Together with appreciate your a review of the materials pan information the following 🙂 For a nice and following website for a short time together with adoring it
WOW Gold
buy tera gold
WOW Items
Hello,
thank you so match.Thats very lovely.
Greatings send you Conny
I’m thinking of this as a holiday gift, lined with parchment paper with a mix of homemade cookies in it… or a bigger one to cozy around my rectangular lasagna pan. (oh, my I must be hungry…)
I am ready to make this tray. I would like to make mine a custom size but want to make sure the proportions are correct. Are the measurements for the large tray correct? The difference between the fabric and the peltex is 3″each side on the small and medium trays but on the large tray the differences are 5″ on one side and then 3″ on the other side. Please let us know.
hi sabspeed. just double checked and all the measurements should be correct. I wanted a higher sided tray for the large size so that it could hold more magazines. If you do the math, the peltex on the large tray is 2″ smaller on all sides than the fabric measurements. I think you might just have the dimensions rotated wrong.
I just made the large tray – thank you. (though I did need closer to a 6″ opening to get the peltex through during the right-side-outing).
Great idea! I love using baskets around the house to organize things, but I never thought to make my own fabric trays instead. Great way to re-use cardboard, too, instead of throwing it in the recycling. I think I’ll make a couple of these today!
Great tutorial! Will have to do this for a friend who just moved into a new apartment;) Thanks! btw: I have a new sewing blog and I’d love for you to check it out. I’m trying to get the word out to fellow sewers and bloggers I follow.
-Reyna
http://www.reynasews.blogspot.com
Love this tutorial; I have been trying to find something to hold post-it notes on my desk at work and this will be perfect—useful, pretty and I can make it!!!
Thanks for the wonderful tutorial, Anna! And it’s so gracious and generous of you to provide links to related tutorials! You’re a born teacher!
Thank you for a great pattern–just made three of these trays for a gift.
PamW
Thanks for sharing!!! I will alter the pattern and not sew the corners but put snaps there so I can lay them out flat when they are not in use. I want to put the class tests in there for marking and not getting them mixed up XD
Love Love this. This is awesome.
Is it ok to print some copies of this to share with my quilt guild as a lesson at one of our meetings?
I love this fabric tray, super easy and fast to make
https://giventostitch.wordpress.com/2015/05/22/hello-world/?preview=true&preview_id=2&preview_nonce=d75df2c455
These trays will make very nice gifts. Thanks for posting.
I want to build a few of these as holiday gifts for the friends I often travel with, but I want to use snaps at the corners so the trays can be flattened for packing. Would you recommend any particular snap, such as the metal spring snaps sold here on your site?